Oracle安裝1.下載Oracle版本:Oracle11g本次提供百度網盤下載,若失效請自行查找資源:百度網盤:https://pan.baidu.com/s/1AOO8BoPc93DHGxO0bXiU4g?pwd=1qaz 提取密碼:1qaz總共7個包,其中1、2表...
本次提供百度網盤下載,若失效請自行查找資源:
百度網盤:https://pan.baidu.com/s/1AOO8BoPc93DHGxO0bXiU4g?pwd=1qaz
提取密碼:1qaz
總共7個包,其中1、2表示Database, 用于安裝、升級數據庫;
3為grid infrastructure,用來升級RAC。如果要使用Clusterware、ASM、ACFS、ASM動態卷等功能時都需要先安裝此包。
4表示客戶端(Client);
567不管
[root@localhost ~]# hostnamelocalhost.localdomain
127.0.0.1 localhost192.168.146.134 localhost.localdomain
[root@localhost ~]#systemctl stop firewalld.service[root@localhost ~]#systemctl disable firewalld.service[root@localhost ~]#vi /etc/selinux/config設置SELINUX=disabled[root@localhost ~]#setenforce 0
yum install -y automake autotools-dev binutils bzip2 elfutils expat \gawk gcc gcc-multilib g++-multilib lib32ncurses5 lib32z1 \ksh less lib32z1 libaio1 libaio-dev libc6-dev libc6-dev-i386 \libc6-i386 libelf-dev libltdl-dev libodbcinstq4-1 libodbcinstq4-1:i386 \libpth-dev libpthread-stubs0-dev libstdc++5 make openssh-server rlwrap \rpm sysstat unixodbc unixodbc-dev x11-utils zlibc cifs-utils \libXext.x86_64 glibc.i686
[root@localhost ~]#groupadd oinstall[root@localhost ~]#groupadd dba[root@localhost ~]#useradd -g oinstall -G dba oracle[root@localhost ~]#passwd oracle[root@localhost ~]#id oracleuid=1000(oracle) gid=1000(oinstall) groups=1000(oinstall),1001(dba)
[root@localhost ~]#mkdir -p /opt/oracle //$ORACLE_BASE[root@localhost ~]#mkdir -p /opt/oracle/product/112010/db_1 //$ORACLE_HOME[root@localhost ~]#mkdir /opt/oracle/oradata //存放數據庫目錄[root@localhost ~]#mkdir /opt/oracle/inventory[root@localhost ~]#mkdir /opt/oracle/flash_recovery_area[root@localhost ~]#mkdir /opt/oracle/fast_recovery_area[root@localhost ~]#chown -R oracle:oinstall /opt/oracle[root@localhost ~]#chmod -R 775 /opt/oracle
[root@localhost ~]#vi /etc/sudoers輸入上面的命令后,打開sudoers文件進行編輯,找到root ALL=(ALL) ALLoracle ALL=(ALL) ALL使用:wq!退出
[root@localhost ~]# vi /etc/sysctl.confkernel.shmall = 2097152kernel.shmmax = 1073741824fs.aio-max-nr = 1048576fs.file-max = 6815744kernel.shmmni = 4096kernel.sem = 250 32000 100 128net.ipv4.ip_local_port_range = 9000 65500net.core.rmem_default = 262144net.core.rmem_max = 4194304net.core.wmem_default = 262144net.core.wmem_max = 1048576
[root@localhost ~]# vi /etc/security/limits.conforacle soft nproc 2047oracle hard nproc 16384oracle soft nofile 1024oracle hard nofile 65536oracle soft stack 10240
[root@localhost ~]# vi /etc/pam.d/login最后插入session required /lib64/security/pam_limits.sosession required pam_limits.so
[root@localhost ~]#vi /etc/profile最后插入if [ $USER = "oracle" ]; thenif [ $SHELL = "/bin/ksh" ]; thenulimit -p 16384ulimit -n 65536elseulimit -u 16384 -n 65536fifi
$在root用戶下,使用命令source profile使環境變量生效
[root@localhost ~]#source /etc/profile
[root@localhost ~]#vi /home/oracle/.bash_profile
最后添加
# For Oracleexport ORACLE_BASE=/opt/oracle;export ORACLE_HOME=/opt/oracle/product/112010/db_1export ORACLE_SID=orcl;export PATH=$PATH:$HOME/bin:$ORACLE_HOME/binexport LD_LIBRARY_PATH=$ORACLE_HOME/lib:/usr/libif [ $USER = "oracle" ]; thenif [ $SHELL = "/bin/ksh" ]; thenulimit -p 16384ulimit -n 65536elseulimit -u 16384 -n 65536fiumask 022fi
保存退出后使環境變量生效
[root@localhost ~]#source /home/oracle/.bash_profile
下載:unzip 解壓插件yum install -y unzip zip
將文件上傳到/opt/oracle目錄下
[root@localhost ~]#unzip p13390677_112040_Linux-x86-64_1of7.zip[root@localhost ~]#unzip p13390677_112040_Linux-x86-64_2of7.zip
解壓完成后/opt/oracle下會生成database目錄
切換用戶并將安裝文件復制到/opt/oracle路徑下
[root@localhost ~]#cd /opt/oracle[root@localhost ~]#su oracle[oracle@localhost ~]#cp /opt/oracle/database/response/db_install.rsp ./
對db_install.rsp文件進行編輯
[root@localhost ~]#vim db_install.rsp
一定要仔細的把參數配置完,仔細!仔細!
oracle.install.option=INSTALL_DB_AND_CONFIGORACLE_HOSTNAME=localhost #實際上可以修改成你自己的主機名或者域名(IP)UNIX_GROUP_NAME=oinstallINVENTORY_LOCATION=/opt/oracle/inventorySELECTED_LANGUAGES=en,zh_CNORACLE_HOME=/opt/oracle/product/112010/db_1ORACLE_BASE=/opt/oracleoracle.install.db.InstallEdition=EEoracle.install.db.DBA_GROUP=dbaoracle.install.db.OPER_GROUP=operoracle.install.db.config.starterdb.type=GENERAL_PURPOSEoracle.install.db.config.starterdb.globalDBName=orcloracle.install.db.config.starterdb.SID=orcloracle.install.db.config.starterdb.characterSet=AL32UTF8oracle.install.db.config.starterdb.memoryOption=trueoracle.install.db.config.starterdb.memoryLimit=1024oracle.install.db.config.starterdb.installExampleSchemas=falseoracle.install.db.config.starterdb.password.ALL=oracleoracle.install.db.config.starterdb.control=DB_CONTROLoracle.install.db.config.starterdb.dbcontrol.enableEmailNotification=falseoracle.install.db.config.starterdb.dbcontrol.emailAddress=test@qq.com #可以填寫你自己的郵箱地址也可以不配置這個參數oracle.install.db.config.starterdb.automatedBackup.enable=falseoracle.install.db.config.starterdb.storageType=FILE_SYSTEM_STORAGEoracle.install.db.config.starterdb.fileSystemStorage.dataLocation=/opt/oracle/oradataoracle.install.db.config.starterdb.fileSystemStorage.recoveryLocation=/opt/oracle/fast_recovery_areaoracle.install.db.config.starterdb.automatedBackup.enable=falseDECLINE_SECURITY_UPDATES=true
操作用戶:oracle
操作目錄:/opt/oracle/database
cd /opt/oracle/database./runInstaller -silent -ignoreSysPrereqs -responseFile /opt/oracle/db_install.rsp
安裝過程到最后會出現如下界面,千萬不要按<Enter>或者ctrl+c, 新打開一個連接,將給出的兩個腳本文件執行一遍,執行成功后再回到當前頁面按<Enter>
The following configuration scripts need to be executed as the "root" user.#!/bin/sh#Root scripts to run/opt/oracle/inventory/orainstRoot.sh/opt/oracle/product/112010/db_1/root.shTo execute the configuration scripts:1. /opt/oracle/inventory/orainstRoot.sh2. /opt/oracle/product/112010/db_1/root.shSuccessfully Setup Software.
操作用戶:oracle
sqlplus / as sysdbastartup
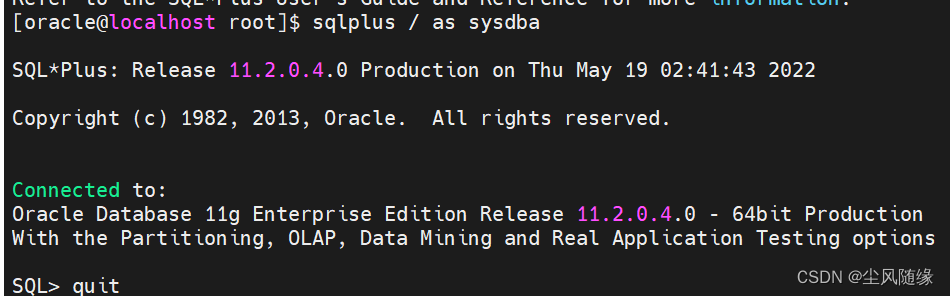
能進去說明安裝成功了
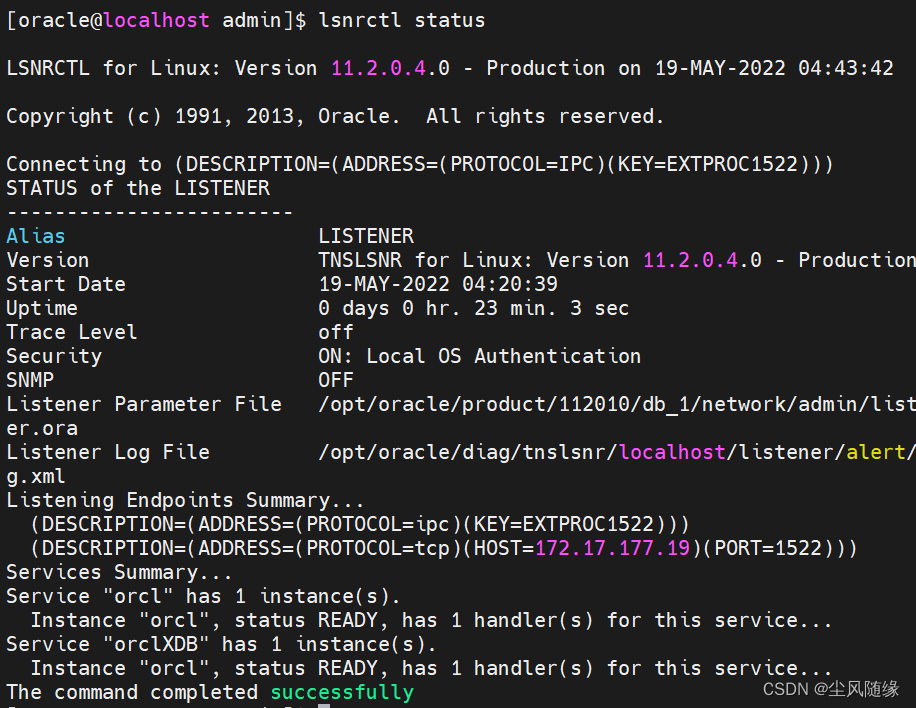
執行命令后有如下效果說明監聽也是正確的
lsnrctl status
也可以修改/opt/oracle/product/112010/db_1/network/admin下的listener.ora 和tnsnames.ora更改監聽配置,更改后執行 lsnrctl restart
lsnrctl restart //重啟lsnrctl stop //關閉lsnrctl start //啟動
[oracle@localhost ~]$ lsnrctl stop[oracle@localhost ~]$ lsnrctl status
[oracle@localhost ~]$ sqlplus / as sysdbaSQL> shutdown immediate
[root@localhost app]# rm -rf /opt/oracle/*
[root@localhost tmp]# rm -rf /tmp/*
[root@localhost tmp]# rm -f /etc/ora*
[root@localhost tmp]# rm -f /usr/local/bin/*
[root@localhost .oracle]# rm -rf /usr/tmp/.oracle/
[root@localhost tmp]# userdel -r oracle[root@localhost tmp]# groupdel dba [root@localhost tmp]# groupdel oinstall
[root@localhost tmp]# vi /etc/security/limits.conf
[root@localhost tmp]# vi /etc/sysctl.conf [root@localhost tmp]# sysctl -p
來源:本文內容搜集或轉自各大網絡平臺,并已注明來源、出處,如果轉載侵犯您的版權或非授權發布,請聯系小編,我們會及時審核處理。
聲明:江蘇教育黃頁對文中觀點保持中立,對所包含內容的準確性、可靠性或者完整性不提供任何明示或暗示的保證,不對文章觀點負責,僅作分享之用,文章版權及插圖屬于原作者。


聯系郵箱:service#改成@jsedu114.com
地 址:中國●江蘇
南京市秦淮區洪武路359號1506室
Copyright?2013-2024 JSedu114 All Rights Reserved. 江蘇教育信息綜合發布查詢平臺保留所有權利
![]() 蘇公網安備32010402000125
蘇ICP備14051488號-3技術支持:南京博盛藍睿網絡科技有限公司
蘇公網安備32010402000125
蘇ICP備14051488號-3技術支持:南京博盛藍睿網絡科技有限公司
南京思必達教育科技有限公司版權所有 百度統計


 新浪微博
新浪微博